Important news from 123Host.au

This email is going to all 123Host customers, even if you have said “no marketing emails” because I have some news.

As I mentioned in an email a few weeks ago, 123Host is 25 years old.  It started because I am a geek and I wanted to help some friends and family with websites and, well you can guess the rest.

I thoroughly enjoy the things I do and learn running the business.  I also really, really enjoy “giving the level of customer service I wish I received from others” and doing it with a light touch and a sense of humour.

However this has been a particularly tough year for me having been diagnosed with prostate cancer at the end of 2023 and then having the pesky thing removed at the end of February – and yes, my body is now clear and I am almost completely recovered.  Additionally, I am celebrating my 69th birthday today and I made the easy decision that it is time to do the things I want to do, rather than those I have to do.  Because of my commitment to you as a 123Host customer, 123Host is a have to do which can sometimes get in the way of other things, like holidays.

So I have sold 123host.

That was a really tough decision made easier by the fact that it has been bought by David, who ran 123Host for me during a couple of my overseas trips not long ago.  He is going to introduce himself down the track, but David has loads of experience running a web hosting business and is also really customer focussed.  We regularly speak to each other if we need advice or a 2nd opinion on something.  David is very knowledgeable and a perfect fit – or this wouldn’t be happening. So there may be a different face at the wheel, but I suspect you aren’t going to notice many other changes, apart from some ideas he has for improving services (Office 365 anyone?).  We are doing a handover during June and it will be David’s baby from July 1st.

Over the years I have donated free hosting to a number of organisations that I support, if that is you, David will be in touch down the track.  If you had a PayPal subscription, I have cancelled all of those so you won’t be auto billed again by me.  Those who paid by direct deposit, will see David’s bank details on your next invoice.  Please be sure to delete the old 123host details (BSB: 034232) in your bank otherwise I will receive your payment – that means more paperwork…and no one wants that.  

Speaking of invoices, if you have an invoice due before June 30th, it would really be appreciated if you could pay it by then so I get the money ;o)  Similarly, if your invoice is due from July 1st onward, please pay in July so the money goes to David.  Obviously we will work it all out, but your cooperation would be a big help.  

I am going to really miss you and 123Host, but ultimately this is a great thing, ensuring stability for 123Host into the future.

Haha…as I am typing this The Last Goodbye by Jeff Buckley started playing on my computer.  Perfect!

I am so glad I gave you the level of customer service we all deserve.  I thank you for being a 123Host customer and wish you much joy and success with your projects.

Steve

Missing WordPress file advanced-headers.php

A bunch of WordPress sites broke without any errors and without that usual “Your site is experiencing technical difficulties” notification. The sites were only displaying a blank White Screen Of Death.

Enabling wp_debug didn’t show anything at all, which is pretty unusual. But in the error log I found Failed opening required '/home/user/public_html/wp-content/advanced-headers.php which is just as it sounds, there is a file that must be included but it couldn’t be opened.

In fact the file is completely missing in each case. I think the error is being caused by some sort of issue with the Really Simple SSL plugin, I remember spotting something about it, but can’t find it again.

No worries, the fix is trivial. Simply create an empty file named advanced-headers.php in the /wp-content directory. I am not sure what the original contents were or what it is supposed to do, but at least this gets the site up again.

Here’s a cautionary tale. All the customers who subscribe to the WordPress Management Thingy had this spotted and then fixed (for free, of course) because it showed up in my management dashboard. Cheap insurance I reckon. Just saying ;o)

How to get email headers

One of the ways to determine if an email is genuine or not is to inspect the headers. Granted, this is fairly technical, but given how convincing scam emails are these days, it is absolutely worth knowing and understanding. You are always welcome to send an email to 123Host.au support for advice, please include the headers as that is important.

Gmail (works for Google Apps as well)

    1. Open the message you’d like to view headers for.
    2. Click the down arrow next to Reply, at the top-right of the message pane.
    3. Select Show original.
    4. The full headers will appear in a new window, simply right-click inside the headers and choose Select All, then right-click again and choose Copy.
    5. Close the Message Source box.
    6. You should now be looking at the original message window. You can copy and paste these message headers into an Email Header Analyzer.

Exchange Online for Office 365

  1. Click to open the email message. 
  2. At the top right hand corner of the message, you will notice a dropdown menu arrow icon, next to the “Reply all” button. Click the dropdown menu arrow icon. 
  3. A menu will open, please select View message details which will appear near the bottom of the menu. 
  4. This will open a new popup window in the bottom right corner with the email headers for the message.
  5. Next, copy the entire page of email headers.
    1. If you are using a computer operating Windows, hold down the Ctrl and A keys on your keyboard to select all of the text. Then with the text still highlighted, hold down the Ctrl and C keys to copy the text (or you can right click with your mouse and select Copy).
    2. If you are using a computer operating with Mac OS, hold down the Cmd and A keys on your keyboard to select all of the text. Then with the text still highlighted, hold down the Cmd and C keys to copy the text (or you can right click with your mouse and select Copy).
  6. Now paste the copied message headers into an Email Header Analyzer.

Outlook 2016 / 2019 / Office365

  1. Double click on the email message so that it is opened in its own window. 
  2. On the Message tab, in the Options section there is a little button with an arrow in it. Click on it and you have the message options menu with the internet headers in the bottom section. 
  3. This will bring up the Message Options window. The last component of this is the Internet Headers. 
  4. Right-click inside the headers and choose Select All, then right-click again and choose Copy.
  5. Close the Message Options window.
  6. You should now be looking at the original message window. You can copy and paste these message headers into an Email Header Analyzer.

Outlook 2013

  1. Double click on the email message so that it is opened in its own window. 
  2. On the Message tab, in the Options section there is a little button with an arrow in it. Click on it and you have the message options menu with the internet headers in the bottom section. 
  3. This will bring up the Message Options window. The last component of this is the Internet Headers. 
  4. Right-click inside the headers and choose Select All, then right-click again and choose Copy.
  5. Close the Message Options window.
  6. You should now be looking at the original message window. You can copy and paste these message headers into an Email Header Analyzer.

Outlook.com

  1. Click to open the email message. 
  2. On the top message action menu, you will notice a dropdown menu ellipse icon (More actions) on the far right, next to the “Forward” (?) icon. Click the dropdown menu ellipse icon. 
  3. A menu will open, please select “View message source. 
  4. This will open a new popup window with the email headers for the message. 
  5. Next, copy the entire page of email headers.
    1. If you are using a computer operating Windows, hold down the Ctrl and A keys on your keyboard to select all of the text. Then with the text still highlighted, hold down the Ctrl and C keys to copy the text (or you can right click with your mouse and select Copy).
    2. If you are using a computer operating with Mac OS, hold down the Cmd and A keys on your keyboard to select all of the text. Then with the text still highlighted, hold down the Cmd and C keys to copy the text (or you can right click with your mouse and select Copy).
  6. Now paste the copied message headers into an Email Header Analyzer.

Zimbra

  1. Right click the desired message and select Show Original
  2. This will open a new window with the source headers, select all and send in a new message to spam@mxtoolbox.com.

Entourage

  1. To begin, open the email message in a new window by double-clicking on it.
  2. Choose View > Internet Headers.
  3. Click inside the new box that appears in your message and choose Edit > Select All.
  4. Click inside the box again and choose Edit > Copy
  5. You should now be looking at the original message window. You can copy and paste these message headers into an Email Header Analyzer.

Mac OS X Mail

  1. To begin, open the email message in a new window by double-clicking on it.
  2. View > Message > Raw Source
  3. Copy the headers by right clicking, selecting all and then choosing copy.
  4. Close the Message Source box.
  5. You should now be looking at the original message window. You can copy and paste these message headers into an Email Header Analyzer.

Outlook Express for Macintosh

Yahoo!

  1. Go to Options > General Preferences
  2. Under Mail Viewing Preferences, go to Message Headers, then select ALL.
  3. Hit the small down arrow next to Forward and choose As Inline Text.
  4. Forward the message to spam@mxtoolbox.com.

Zoho Mail

  1. Click to open the email message. 
  2. On the top message action menu, you will notice a dropdown menu arrow icon (More actions) on the far right, next to the “Forward” (?) icon. Click the dropdown menu arrow icon.  Dropdown menu
  3. A menu will open, please select “Show original.”  Clicking Show Original
  4. This will open a new popup window with the email headers for the message. 
  5. Next, copy the entire page of email headers.
    1. If you are using a computer operating Windows, hold down the Ctrl and A keys on your keyboard to select all of the text. Then with the text still highlighted, hold down the Ctrl and C keys to copy the text (or you can right click with your mouse and select Copy).
    2. If you are using a computer operating with Mac OS, hold down the Cmd and A keys on your keyboard to select all of the text. Then with the text still highlighted, hold down the Cmd and C keys to copy the text (or you can right click with your mouse and select Copy).
  6. Now paste the copied message headers into an Email Header Analyzer.

Hotmail

  1. In the left pane, click Mail.
  2. In the Folders list, click Inbox.
  3. Once in the Inbox, click on the message that you are getting the headers for.
  4. Right-click the message in the message list, and then click View source.
  5. The full headers will appear in a new window, simply right-click inside the headers and choose Select All, then right-click again and choose Copy.
  6. Close the Message Source box.
  7. You should now be looking at the original message window. You can copy and paste these message headers into an Email Header Analyzer.

Thunderbird

  1. To begin, open the email message in a new window by double-clicking on it.
  2. Choose View > Headers > All
  3. This will expand the top of your email message and it will now include the full headers.
  4. Right-click again and choose Copy.
  5. You should now be looking at the original message window. You can copy and paste these message headers into an Email Header Analyzer.

This is an edited version of https://mxtoolbox.com/public/content/emailheaders/ – mxtoolbox.com is a terrific resource for digging into information about DNS in particular.

Starting a business: six .au domain name tips for new businesses

4 October, 2023 – modified from original source: https://www.auda.org.au/blog/starting-business-six-au-domain-name-tips-new-businesses

When you start a business, a carefully thought-out digital presence can help you get ahead. Ninety-nine per cent of Australian adults use the internet, so a business website and email address with a professional, easy-to-remember domain name will help you to reach a broad audience and connect to your potential customers. 

Below we set out six tips for selecting a domain name to set your business up for success. 

1.    Choose a memorable domain name relevant to your business 

A domain name is your digital address and a key element of your brand identity. Choose a domain name that: 

  • Reflects your business name or services – this helps build brand recognition and makes it easier for people to find your website when searching online. 
  • Is short and simple – this makes it easier for customers to remember and type your domain name into a web browser. As a guide, aim for 15 characters or less. 
  • Avoid hyphens, numbers and symbols – these can be difficult to remember, misinterpreted if received verbally and mistaken for illegitimate websites. If you must use a number, use its written form i.e. “two”, instead of “2”. 
  • Passes the “radio test” – this is a simple way you can test the effectiveness of your domain name. Say the name to five people and get them to write it down. If they don’t get it right, consider a domain name that’s simpler to convey. 

2.    Consider .au for a trusted option

Australians choose .au because it’s local, trusted and secure. Research shows three out of four Australians trust a website that ends in .au. Half of Australian consumers say they will only shop on websites that end in .au. Given its popularity among consumers, it shouldn’t be surprising that three of four Australian small businesses choose .au as the primary domain for their websites. As an Australian business without a .au domain name, you may be missing out on a large segment of the market. 

There are a number of .au namespace options available. The com.au namespace is dedicated to businesses registered to trade in Australia. This a good option for existing small and medium businesses. For entrepreneurs (or those still dreaming up their big idea!) .au direct is a great choice. It’s a short, simple, uniquely Australian option that is available to businesses as well as individuals and organisations. 

3.    Check the domain name you want is available and doesn’t infringe on a trade mark

When you’ve decided on a domain name you’d like to register, check if it’s available via the ‘find a domain name’ tool on the auDA website. If your preferred domain name isn’t available, choose another option, keeping in mind our tips at point 1 above. 

It’s also a good idea to check whether there may be any trade mark issues associated with your desired domain name. Conduct a trade mark search to check if the domain name you’d like to register is registered as a trade mark in Australia. If it is, we suggest you seek legal advice or select an alternate domain name.

4.    Register your domain name when you set up your business

Registering a business on the Australian Business Registration Service does not mean you automatically access a corresponding domain name. .au domain names are licensed through 123Host as a separate process. Although separate, we recommended you complete these steps at the same time to ensure you’re able to register a business and domain name that complement each other. 

If you are planning a complementary social media presence, it’s also worth checking your preferred social media handle is available to secure the digital identity of your brand. 

Even if you don’t intend to build a website right away, registering a domain name means it will be available when it’s time to launch your website or business email address. 

5.    Set a reminder to renew your domain name to prevent it from expiring 

.au domain name licenses are not granted indefinitely, but for a period of one to five years. You must renew your domain name license before it expires to continue using it. .au domain names can be renewed 90 days prior to the licence expiry date. Your registrar will send you a reminder email as the end of your licence period approaches.

Keep your contact information up to date to ensure you receive these emails. If your .au domain name licence expires before you renew it, you’ll have a 30-day grace period in which to renew your licence. Some registrars may charge a fee to retrieve an expired licence within the grace period. If you don’t renew it within the grace period, the domain name will become available to be registered by the public on a first-come, first-served basis. 

You can check your .au domain name licence expiry date and contact details with the auDA password tool.

6.    Do your domain name due diligence when buying an existing business 

If you become the new owner of an existing business and you plan to use the domain name associated with that business, you must have the domain name licence transferred to you. The transfer of a domain name is not a process that occurs automatically with the sale of a business. If the domain name is not transferred, there can be disruption to the business’ website and/or email services. 

Much like transferring the registration of a car, it is a joint responsibility for both parties to approve the domain name licence transfer. Learn more about transferring a domain name when buying or selling a business

Some big changes at 123Host

Friday Afternoon

There have been a few ongoing niggles that are being sorted as people discover them. If you are seeing this when you try to send in gmail…

get in touch. It seems that google has lost the connection to your outgoing mail server, it is a very easy fix.

Friday Morning

Well, the migration finished and now the resource graphs look like this, with everything settling down :o)

If you haven’t already, please CHECK YOUR WEBSITE. There have been a couple of instances where some things didn’t migrate properly. They are fixed really quickly, but I have to know about it.

Over the next week there will still be some fine tuning. There are a bunch of things that are different and some new things. But that is for another post to keep separate from the migration story.

Thursday 2145PM (AEST)

To the handful of people suffering a bit of pain, please be patient. The migration is at 75% and should be completed within a couple of hours. Meanwhile it is a balance between going hard to get it done quickly or stretching it out and reducing pain for some but increasing it for others.

The server is running hard at the moment – the graphs flatten because certain things like RAM usage reach a specified limit to prevent everything bogging down.

I am going to post the comparison in the morning.

Thursday 1400PM (AEST)

We have just successfully tested the first migrations. Happy Dancing here so far!

Because the old server and new server are in the same data centre, transfers are lightning fast, it will still take some time to do them all (there are a lot of accounts).

The majority of sites should be on the new server by about 1630, the bigger sites which we are leaving until last will take until about 2230.

Thursday 1230PM (AEST)

If you read my earlier post you will have an understanding of what has been happening. The migration to a new server will happen this afternoon and into the evening, it will take quite a while. There should be no downtime for any sites, but as with any technology, what could possibly go wrong?

I’ve asked them to keep me informed about the progress and I am going to update this page as often as I can.

Some people will need to be contacted to update settings, but even those sites will continue working, it is just something that will need to be done within the next couple of weeks.

IF YOUR SITE WAS WORKING AND YOU SUDDENLY NOTICE IT ISN’T, EMAIL ME but I have been assured “we have done this thousands of times and it should be fine” – what can I do except trust them/

The outcome of all this should be a stable, faster server and a more chilled Steve.

I appreciate your patience up until now. If you have any questions, fire away.

Thursday 10:30AM (AEST)

If you are a 123host customer you will know that the server has been pretty unreliable for the last week or so. There has been a bunch of brief outages and a couple of extended outages. Some of you will know because you have spotted the problem, others know from the email I sent out. Whichever you group are in, I sincerely apologise for this and offer the following without it being any way a lessening of my responsibility.

Something is going on. Between me (with help from a fellow web host), the server provider and cPanel (the operating system developers) we have spent a lot of time trying to diagnose what is going on, so far without success. What they say is happening (and I don’t necessarily agree) is that there are too many accounts on the machine and at times it runs out of memory. An inbuilt safety system then shuts down some processes to bring things back under control.

Think of it as though you are driving at night and your car battery is a little low because you have too many electrical things running, suddenly your headlights (=the website software) stop working, but your car (=the server) is still running. Your car has some smarts and it turns off the radio and some other devices (=some running processes), then turns the headlights back on again and away you go – that is a near enough metaphor. But sometimes, for some reason, it doesn’t automatically turn the headlights back on, you have top lift the bonnet and flick a switch manually.

I can’t tell you how stressful this has been. I really try to deliver up to (in excess of?) my own expectations of services I receive and this is below that.

So after probing and thinking and eventually biting the bullet, 123Host will be moving to a much more powerful server at a new provider. This isn’t through any dissatisfaction with the old one, I have been there for a number of years and am mostly happy. But they are changing the model of how they provide servers so that in future I have to manage everything – software licenses, account backups, tech fixes etc. This will mean a lot more work for me, some of it beyond my skills. I would rather pay a bit more and have people who know this stuff do the stuff I don’t know.

I am waiting for a report from the new provider after they had a poke around in the server overnight. I anticipate that over the next week all sites will migrate to the new server. For most of you it will be transparent and painless. I will have to contact a few people to update some settings, but there is no urgency, everything will keep working.

That’s all for now. I will keep updating here as I know stuff.

Intermittent outages

October 22nd

You may have noticed that there have been several server outages over the last few days resulting in sites not being reachable.  Firstly I sincerely apologise for this, obviously it is not part of the grand plan.

In tandem with the data centre, I am working hard to determine the underlying cause.  The problem is that when everything is working, there is nothing to see.  It is trying to investigate at the very moment when a glitch is taking place, but we haven’t even figured out what is triggering it yet.

What I want you to know is that I am fully aware it is happening and that we are doing everything possible to get it fixed as a matter of urgency. 

I will update this post with what I know as regularly as I can.  If you have any questions email me, support@ – as usual I will be as honest and transparent as I can.


[UPDATE]
I haven’t been smiling much today, but the data centre replied and the jargon filled explanation put a wry smile on my face

We have fully reviewed all logs and from what we can tell the kernel is killing processes due to out-of-memory errors. The majority of RAM is being used as a cache for the database.

We have modified some settings to reduce normal system RAM usage and also reduced how aggressive the oom killer is.

It makes sense to me, but am thinking of offering a prize to the first customer to decipher it :o)


[LATER UPDATE]

The data centre hasn’t been able to solve this yet, so they have escalated it to cPanel, the developers of the server software.

How to programme a YS-902 smart timer for backgammon

I know this isn’t 123Host.au server related, but it needs to be documented somewhere and this is the best place for me. I play a lot of backgammon. My partner Chris White and I – together we are the Pip Squeaks – are the 2023 Australian Doubles Champions. I still can’t quite believe it…and in the photo, it looks like it :o)

Down to business. The Gold Coast backgammon club is introducing playing with clocks to try to stop tournaments taking too long. It is also good practice for the Australian Championships which apparently will require clocks to be used.

Many of us have the YS-902 Smart Timer clocks. They are arcane to programme, the instructions are from China and as usual, are pretty useless. They are really a chess clock, but this is focussing on Backgammon use, incorporating a delay before counting down. I am going to assume a 10 second delay with 12 minutes to play.

Turn on the device 2 clicks to the “beep” option, the sounds are helpful.

Press the up or down key until rule selecting symbol, the flashing dot, is to the right of delay. This indicates the mode we will be editing.

The big numbers (basic time) are the total time, the small numbers in the middle at the top (bonus/delay) is the delay. In the image below you can see the 12 minutes time and the 10 second delay. There is no dot next to delay because I didn’t time the photo properly :o)

Now to change the settings.

Hold the button confirm/reset button (2nd from left) for about 3 seconds until it beeps. Stupid programming, the screen doesn’t indicate you are in edit mode, but you are.

Press it again and the steps numbers will show 000.

Press it again and the left hand 0 (hours) will start flashing. This is the point at which you can start adjusting times by using the up and down arrows. Assuming you don’t want your total game time to be over an hour, we need to move to the minutes (currently 12).

Press the start/pause button and the 12 starts flashing. Now you can adjust the minutes up or down using the up/down buttons. Once you have the number of minutes you want press start/pause button again to shift to the seconds. You can now adjust the number of seconds e.g. you want 12 minutes 30 seconds time.

Now comes a little bit of magic. Press the start/pause button again and it will jump to the delay, but helpfully, it makes the right hand clock match the left hand clock.

Adjust the delay up or down. As I said at the Gold Coast Backgammon Club we use 12 minutes with a 10 second delay.

So your clock should look like the image above, but something is still flashing because it is in edit mode.

Press the button confirm/reset button and the the steps numbers will show 000 again and everything stops flashing.

To save your settings now hold the confirm/reset button for 3 seconds, the timer will beep and you are ready to use the clock.

To start the clock in game mode, press the confirm/reset button so that the steps numbers show 000. Now press the start/pause button and the delay starts counting down. Press the start/pause button again to pause.

To reset for a new game, hold the confirm/reset button for 3 seconds at any time.

You’re welcome :o)


The Gold Coast Backgammon Club (Australia) meets at Diggers RSL on Monday nights from 1800hrs and at Mermaid Beach Tavern on Thursday nights from 1800hrs.

Tournaments are usually 5 points with $5 entry with a $5 side pool. Tournaments are ANZBGF rated

There are often other tournaments and casual chouette sessions. Tutoring is available from 3 times Australian champion Steve Roberts.

More information via Twitter or Facebook

JetBackup 5 to Backblaze B2

I ABANDONED THIS – it was way too slow. The initial backup took almost a week, then incremental backups took 2 days. B2 is a very cost effective storage solution, but not for backups of cpanel servers via jetbackup.


Without going into the reason, I needed to change the server backup strategy from a remote FTP solution to something else. Backblaze B2 is quite attractive in that their storage charges are only $US0.005c per Gb per month. That’s only $US5/Tb/month.

The latest version 5 of JetBackup (JB5) supports B2 backups using the S3 API, but there are a few quirks. Hopefully I will save you some of the pain I experienced getting this going. This page assumes you know the basics of B2 and buckets.

Here’s the JB5 destination setup screen.

Choose S3 Compatible as a destination type and give it a Destination Name that works for you.

Choose Custom Vendor from the vendor list. Maybe one day they will include B2 in the list

Add your Backup Directory

I struggled with finding the end point for quite a while and discovered that your bucket must have been created after (from memory) 2014 or it won’t have an endpoint setting. Since I had a very old bucket that was empty, I deleted it and created a new one.

Something else that took a while to find: https://www.backblaze.com/b2/docs/s3_compatible_api.html

Access Key ID and Secret Access Key

For the purposes of terminology, the Application Key and Application Key ID are the equivalent of the Secret Access Key and Access Key ID respectively.

AHA! This was the key (pun intended) to getting it working. If only there was some consistency with terminology.

The rest was a breeze.

Lamest excuse ever?

I know I rail about WHMCS and their horrible culture, and I know you think I am exaggerating, but this will put your mind at rest and once again I get to be right.

I misunderstood some instructions from a customer and included some extra things in an order I placed on their behalf. Let’s pretend the total of the order was $232.50 (which it was).

This is what it looks like in the orders list

What if I told you that the order was then edited via the “proper” way to do it, a bunch of items were removed so that the total was now $55, but it still shows $232.50

Any rational business owner…nay, human, would say “there is something wrong here”…or is it me?

It must be me, because despite the order only being for $55 worth of items, WHMCS insist that it is correct. What is great about this is the support ticket exchange and the ultimate excuse for why they do it:

I had an order to the value of $232.50

The order needed to be modified so some items were deleted and the invoice modified to now be $55.

However the order s still showing the original amount...why - see attached (with a screenshot like that above)

The order record provides a static record of the details at the time of ordering. You can certainly adjust the service First Payment Amount/Recurring Amount values and the invoice directly to change how much the client is actually charged. But the order total will always reflect the total of the order at the time of ordering.

Statement of fact…I want to know why and I am beyond expecting anything rational, so I get off to a good start

That is madness beyond what is typical for WHMCS

Please explain the logic behind an order being changed but the value of the order not being changed.

The value of the invoice or services can be changed, but that doesn’t change the value at the time the order was placed. WHMCS provides a mechanism to track all these values.

Still not answering the unanswerable…I push on


Please explain under what circumstances a person might want to keep track of the value of an order "when it was placed" when the ultimate value of the order was changed?

Because I can't, for the life of me, imagine such a situation.

It is valuable to know the price your customer saw in the shopping cart and checkout pace prior to placing their order, so that you can know their price expectations and how they might react to an increase or decrease vs that price.

WHAT THE F’ING F????

Apart from not really making sense, it doesn’t make any sense at all. Here is where this is at right now…


LOL...that is the most ridiculous thing ever John. THAT is why I would want to not see the true value of an order? You are joking, right?

I know you have to struggle to defend many of WHMCS quirks, but that one is worth sharing.

They are truly bizarre, and can produce a mostly workable product, but seem to have no idea how people run a business.

How (not) to monetise a WordPress plugin

DO NOT DO THIS – there is some useful info in here but there are quite a few problems and you should not use it on your plugin. If you do, your WP plugin will be suspended. The issue is a WordPress T&C that states that a plugin can’t include code that is dependent on the user paying to activate it. The workaround is to create a completely separate Pro version.

In about 2010 I adopted an abandoned WordPress plugin that was really useful, but needed some TLC. I tried really hard to contact the original author but I am not sure they used their real name. So I forked their plugin to create an improved version – I could never have written it from scratch. Since then I have spent countless hours improving the plugin, the original author would hardly recognise it.

My plugin had always been free to use and I asked for donations. Between 2010 and 2022 I received less than $500 in donations for the “countless hours” I had put into the plugin. I actually didn’t have a problem with that. But then on two separate occasions, people asked for a complex feature to be added, promising a donation, and then never following through. It pissed me off and I felt they had taken advantage of me.

Rather than not keep working on the plugin (my first reaction), I decided it was time to get a reasonable return for my work. But finding information on how to monetise a WordPress plugin was pretty much impossible. There are a couple of commercial licensing solutions, but they are quite expensive.

I started with WooCommerce (WC) and the License Manager for WooCommerce plugin. WC is a no brainer, it works, is easy to set up. The License Manager also works really well, but it didn’t do some things I wanted, especially being able to get the license key in plain text to add to a database.

So after spending too much time trying to solve that, I decided to create my own API, then I could do whatever I wanted with the data. I am a hack PHP developer, I can do stuff, but I am sure that any “expert” would have a bit to say about my code. But I got this done and I hope my solution helps you.

My plugin is really useful for community and activist groups, and having run a (successful) campaign I know that usually money comes out of an individual’s pocket. So for me personally, it was important that there be a very usable free version as well as an incentive to upgrade.

I wanted a solution that

  • Worked
  • Is easy for the user to manage
  • Is easy for me to manage i.e. automated
  • Is difficult enough to circumvent – but nothing is impossible to get around
  • Is fairly priced and didn’t use a subscription model (which I regard as gouging)

Before getting into the details, here is an overview of the process, step by step.

  1. Customer purchases a license via WooCommerce
  2. If PayPal payment succeeds WC order is automatically processed
  3. A database is updated with license details
  4. License key is sent to customer in a custom email, not from WC or a license plugin

Then…

  1. Customer inserts key into a form in the plugin
  2. Data are submitted via a custom API
  3. Database is checked and updated if the key is valid
  4. API responds with the status of key
  5. Assuming valid, a cURL request is sent to update a file so that all features are enabled

I am going to assume you have a reasonable level of competency so I will skip mundane stuff e.g. setting up WC.

A few things have to happen when a customer places an order and pays. The first hurdle was that WC will leave an order as “processing” until it is manually changed to “complete”. Since I wanted this to be automated and instant, I had to find a way to have the status change on payment. The Autocomplete WooCommerce Orders plugin does exactly what it says.

To make it work you add a function to your theme-child functions.php – assuming you know at least as much PHP as me, this should be enough to go on.

add_action('woocommerce_order_status_completed','payment_complete');

function payment_complete($order_id)
{

// get the order and the order data
$order = wc_get_order( $order_id );
$data = $order->get_data(); 
// this is the magic
$order->update_status( 'completed' );

// generate a license key
    $characters = '23456789ABCDEFGHJKLMNPQRSTUVWXYZ'; 
    // I don't include I/L/1 and 0/O to avoid typos in some fonts = saves work for me solving this for a customer.
    $licenseKey = ""; 
    $blockLength = 4; // how many characters in a block
    $blockCount = 6; // how many blocks
    $blockDelimiter = "-";

    for($x = 0; $x < $blockCount; $x++){
        for ($i = 0; $i < $blockLength; $i++) { 
        $index = rand(0, strlen($characters) - 1); 
        $licenseKey .= $characters[$index]; 
        } 
        if( $x < ( $blockCount - 1 ) ) $licenseKey .= $blockDelimiter;
    }
    // this produces a key something like CXK8-YHVX-G9Z6-JRWS-JF78-X2N3

// set up your PDO connection here

// save the data to the verification db
$sth = $conn->prepare("INSERT INTO licenses(licenseKey, licenseName, licenseEmail, licenseOrderID, licenseCreated) VALUES(?, ?, ?, ?, ?)");

$sth->execute(array( $licenseKey, $data['billing']['first_name'] . " " . $data['billing']['last_name'], $data['billing']['email'], $data['id'], date("Ymd-H:i:s")));

// email the key to buyer
$to = $data['billing']['email'];
$subject = 'Plugin License Key';
$from = 'you@example.com';

$headers  = 'MIME-Version: 1.0' . "\r\n";
$headers .= 'Content-type: text/html; charset=iso-8859-1' . "\r\n";
$headers .= 'From: '.$from."\r\n".
'Bcc: you@example.com' . "\r\n" .
    'Reply-To: '.$from."\r\n" .
    'X-Mailer: PHP/' . phpversion();
 
$message = '<html><body>';
$message .= "<p >Hi " .$data['billing']['first_name'] . '</p>';
$message .= '<p >Your license key is:</p>';
$message .= '<h2 >' . $licenseKey. '</h2>';
$message .= '<p >Add it at <em>dashboard</em> > <em>plugin</em> > <em>settings</em> </p>';
$message .= '</body></html>';
 
  // Sending email
  if(!mail($to, $subject, $message, $headers)){
    mail("you@example.com", "Plugin Email Fail - functions.php", $to . " :: " .  $message);
  }

}

OK, so now we have our order set to completed, we have save the data to our license database and we have sent the key to the customer. So far, so good. Now we need to handle what happens when they apply the key to upgrade to your Pro version.

On a page in the plugin I have a form to enter the key

The “click here” link goes to a page with info about the license and how to order.

When they click verify it calls some jQuery

jQuery('#licenseKeyButton').click( function () {
	var licence_key = jQuery("#license_key").val();
        jQuery.ajax({
           type: "POST",
           url: "<?php echo admin_url('admin-ajax.php'); ?>",
           data: {action:'plugin_verify_key',key:licence_key},   
           cache: false,
           success: function(response){
 
                response = jQuery.parseJSON(response);
                
                if(response.status == "valid"){
                    //do some things e.g. change button to green
                }
                else{
                    // do some other things e.g. change button to red      
                } 
           }
    	}) 
    });

The most important part of this is the line data: {action:'plugin_verify_key',key:licence_key}, we are using ajax to trigger a function and send the license key.

So far, so good. But before doing anything, we need to create an API. I had never done anything like this before and I was surprised that it wasn’t too complex.

I created a subdomain verify.example.com but you can do it any way you like, simply change URLs to suit.

The most important bit to note in the code below is "returnFile"=> "mycode" where “mycode” is part of the name of your file that is being upgraded. In this case it would be mycode.php.

To explain: When someone upgrades with their key, a cURL call is made (we’ll get to that) and the contents of a file (mycode.php) are replaced with code that doesn’t have any limitations on features. But I don’t want people to easily figure out which file that is. By passing the file name in the API response it isn’t in plain sight. But I am under no illusion that this fools everyone.

Also, there is a step for where people can revoke their key. Maybe they want to move the license to a new site. I’ll leave it to you to figure out how to grab the code from the WordPress plugin SVN to replace the Pro code with the original plugin code and do some other work. It is all based on other actions you’ll find in the code here.

// stop any casual visitors
if( !isset($_GET["key"]) ){
    echo "Thanks for visiting";
    exit;
}

// set up your PDO connection here

// check that the key is valid
$sth = $conn->prepare("SELECT * FROM licenses WHERE theLicenseKey= :key ");
$sth->execute([':key' => $_GET["key"]]);

//get our status
if ($sth->rowCount() == 1) $status = "valid";
if ($sth->rowCount() == 0) $status = "key fail";
if ($sth->rowCount() > 1) $status = "multiple results";
if ($_GET["action"] == "revoke") $status = "revoke";

// At this point you may want to log whatever happens - I do, but you need to do some work yourself

//based on our status, if failed
if($status == "key fail"){ 
    echo "Thanks for visiting";
    mail("you@example.com","API error - key fail", "Key fail for  " . $_GET["key"] . " from " . $_SERVER['REMOTE_ADDR']  );
    exit;
}
elseif($status == "multiple results") {
// if the key exists multiple times in the database - this is incomplete so far, but is to prevent the same key being used on multiple sites
    echo "Thanks for visiting";
    mail("you@example.com","API error - multiple for license", "Multiple records returned for " . $_GET["key"] . " from " . $_SERVER['REMOTE_ADDR'] );
    exit;
}

// Update our license in the database - you remember it was added when the customer paid.  Now they are activating, we need to add that data to the record.

// first we check if they are revoking the key, if so, revert the data record
if(isset($_GET["action"]) && $_GET["action"] == "revoke" ){

    $sth3 = $conn->prepare("UPDATE licenses SET licenseActivated=0, licenseActivatedDate='', licenseDomain = "" , licenseIP='" . $_SERVER['REMOTE_ADDR'] . "' WHERE licenseKey= :key ");
    $sth3 ->execute([ ':key'=>$_GET["key"]]);
    
    $object = [
        "status"=> "revoked",
         "returnFile"=> "mycode"
    ];
    //send response
    header("content-type: application/json");
    // send the status and file name back
    echo json_encode($object);
    exit;
}else{
// if we get this far, success.

// update the record then do more stuff
    $sth3 = $conn->prepare("UPDATE licenses SET licenseActivated=1, licenseActivatedDate='" . date("Ymd-H:i:s") . "', licenseDomain = :domain , licenseIP='" . $_SERVER['REMOTE_ADDR'] . "' WHERE licenseKey= :key");
    $sth3 ->execute([ ':domain'=>$_GET["domain"], ':key'=>$_GET["key"]]);
}

// create our response
while ($thekeys = $sth->fetch(PDO::FETCH_ASSOC)){
    $object = [
       "id" => $thekeys['licenseID'],
        "key"=> $thekeys['licenseKey'],
        "domain"=> $thekeys['licenseDomain'],
        "status"=> "valid",
        "returnFile"=> "mycode"
    ];
}

//send response
header("content-type: application/json");
echo json_encode($object);

Whew…so now we have some code waiting to receive data, test if it is valid or not and send back a response. Let’s do that.

The function to send the data is in a separate PHP script that you can name anything, so let’s call it processkey.php.

This is where our action plugin_verify_key is triggered

// you will substitute your plugin context for "plugin"
add_action('wp_ajax_plugin_verify_key', 'plugin_verify_key');
add_action('wp_ajax_nopriv_plugin_verify_key', 'plugin_verify_key');

// notice it is passing the value of "action"
function plugin_verify_key($action) {
     
    // check if the license key was sent, or if it already exists as an option
   if(isset($_POST['key'])){
        $license_key_value = $_POST['key'];
    }
    else{
        $license_key_value = get_option( 'plugin_license_key' );
    }

    // allow for plugin upgrade, we'll get to that later
    if($action == "upgrade"){        
        $license_key_value = get_option( "plugin_license_key" );       
    }

    //if there is no license key, stop the function
    if ($license_key_value == "" ) return; 
     
    $curl = curl_init();

    // set up our API call
    $url = "https://your.api.url.com?key=" . $license_key_value ."&domain=" . $the_domain . "&action=upgrade&version=" . get_option( 'plugin-version' );
    
    curl_setopt_array($curl, array(
        CURLOPT_URL => $url,
        CURLOPT_RETURNTRANSFER => true,
        CURLOPT_FOLLOWLOCATION => true,
        CURLOPT_ENCODING => "",
        CURLOPT_MAXREDIRS => 10,
        CURLOPT_TIMEOUT => 30,
        CURLOPT_HTTP_VERSION => CURL_HTTP_VERSION_1_1,
        CURLOPT_CUSTOMREQUEST => "GET",
    ));

    // get our API response
    $response = curl_exec($curl);
    curl_close($curl);
  
        //The API returns data in JSON format, so first convert that to an array 
        $responseObj = json_decode($response, true);

    if ($responseObj["status"] == "valid"){  
            //get the name of the file from the response
            $filename = $responseObj["returnFile"] ;
            //build our URL to get the Pro version file
            $incomingURL = "https://your.api.url.com/" . $filename . ".txt";
            //get the contents of that file
            $getFile = file_get_contents($incomingURL);
            // where are we going to write those contents
            $thefile = dirname(__FILE__) . "/" .$filename . ".php";
            $doWrite = fopen( $thefile , "w");
            fwrite($doWrite, $getFile); 
            fclose($doWrite);
        
        // obfuscate what has been done by touching each file in the directory
        $files = scandir(dirname(__FILE__));
        foreach($files as $file) {
          touch(dirname(__FILE__) . "/" .$file);
        }
    }

// if it is a plugin upgrade, not a new key, quit the function here
if($action == "upgrade"){ return; }

// otherwise it is a new license activation so create an array 
$response = array();

$response["status"] = $responseObj["status"];
$response["license_key"] = $responseObj["key"];
$response["licence_key_verified"] = "1";

// add some values to the wp_options table
if($response["status"] == 'valid'){
    update_option('plugin_license_key', $response["license_key"]);
    update_option('plugin_license_key_verified','1');
}

// and then send our data back to the page
echo json_encode($response);
    
     exit;
 }

As I am creating this page, I see how complex this is. That it works is impressive…to me.

So…now they have entered their license key and clicked to verify. Assuming a valid key: the jQuery code makes an ajax call to processkey.php which sends data via cURL to your.api.url.com. Based on the result of a database lookup (Does the key exist? Only once?), the database is updated, some options are set and a file is over-written with “Pro version” code. Then a response is sent back to processkey.php which passes data back to the original page. Making sense so far? If I was reading this, I am sure at this point I would have to go back and read the code again.

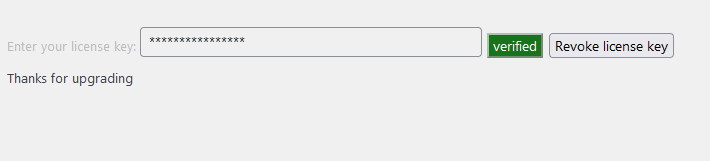
Back in our form we give the user a nice response after the ajax success event. I change the colour of the button to green, the text to “verified”, disable it and hide the key with “*******”. Plus I add a message thanking people for upgrading.

The last thing to cover is if people have upgraded and I am releasing a new version of the plugin. When this happens, the entire plugin is replaced with the new version, over-writing my Pro code.

I handle this in the install function

     // whenever I do an upgrade I have to remember to change the version number here
     if ( version_compare( $installed_version, '1.0.0', '<' ) == 1 ) {
        
        // if it is already verified, run the function, passing the "upgrade" value
        if( get_option( 'license_key_verified' ) == 1 ){
            plugin_verify_licence_key("upgrade");
        }
    }

Jump back to processkey.php and at about line 15 see if($action == "upgrade"){. This is inside a call to the plugins_loaded action and is run every time wordpress is loaded. But it checks version numbers.

Assuming it is a new version, after the plugin is updated there is the same call to re-write the file with the Pro version code but then the function stops running if($action == "upgrade"){ return; } before updating options or returning a response. So the Pro users have an upgraded plugin and still have all the features.

I am aware of a potential security issue and am working on digitally signing the files that are downloaded to upgrade to Pro.

The result of all this has been a spectacular success. I had an upgrade target for the first 2 months. Maybe I was being modest, but I have hit double that number.

Thanks for reading this far, I hope it has helped you, just like code others have shared helped me.

I wish you success with your plugin.